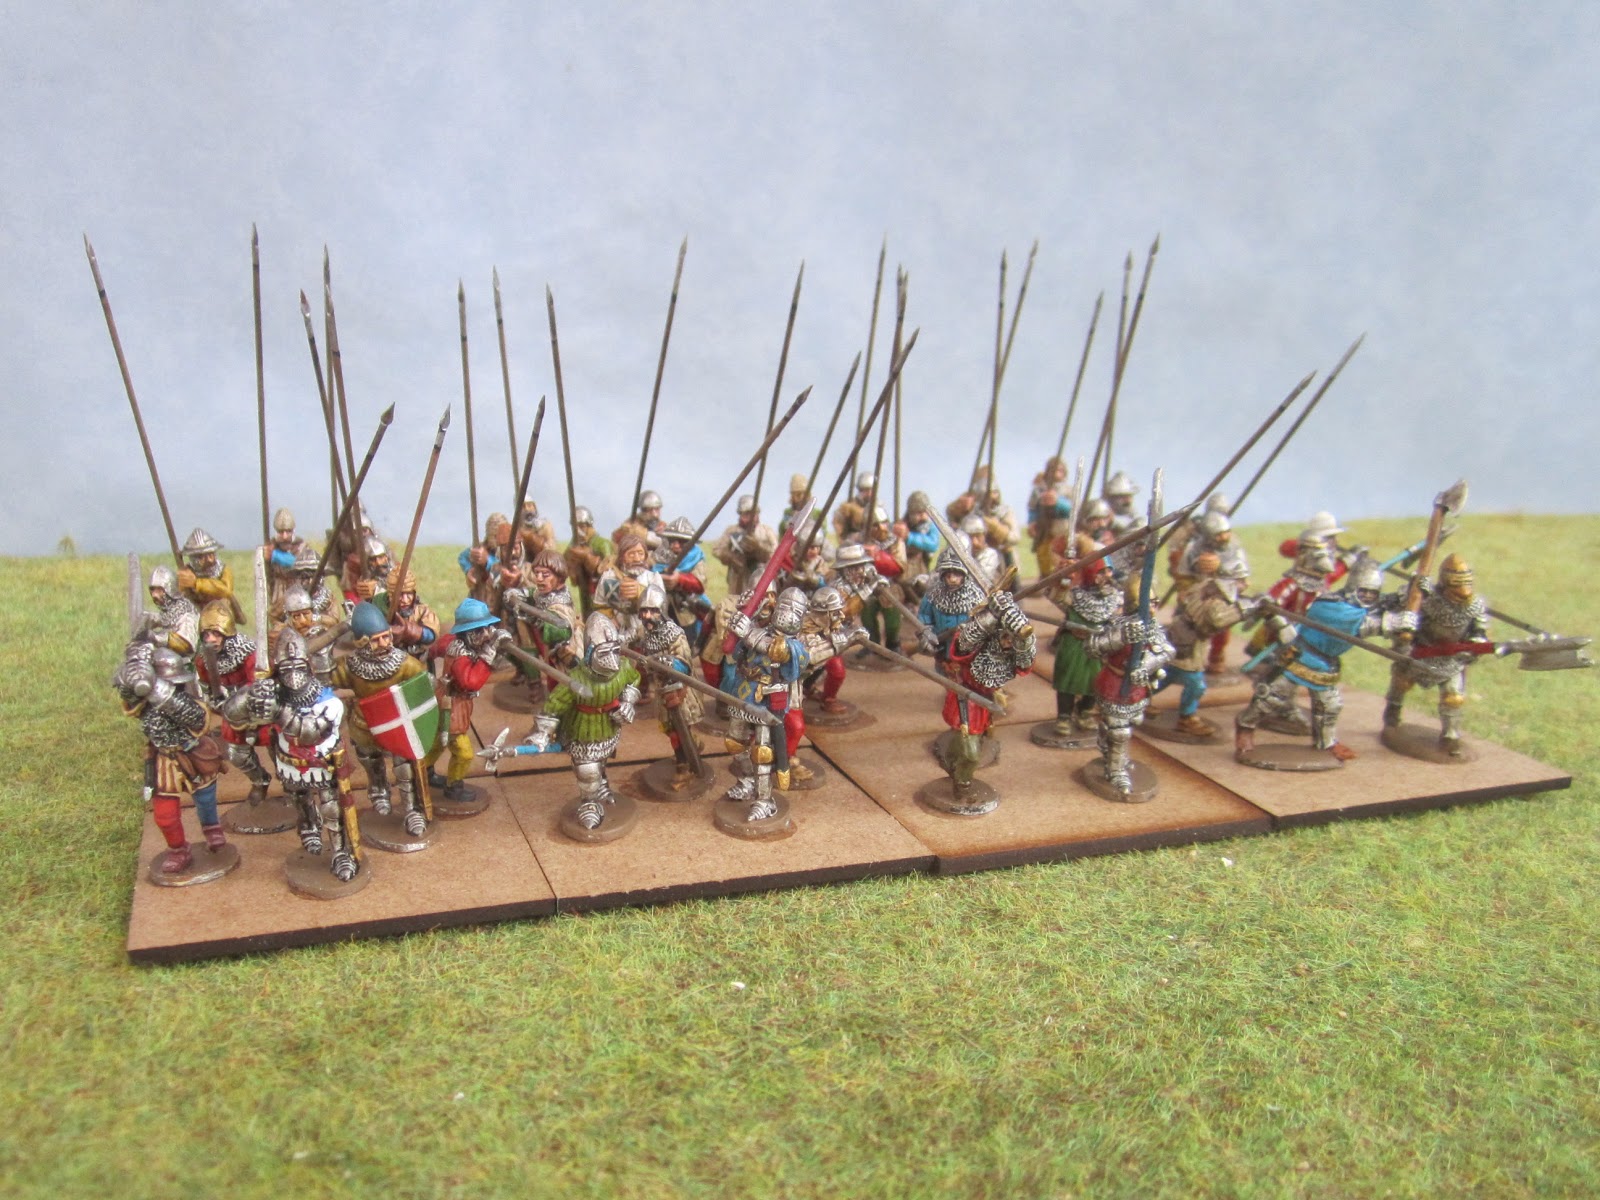
As I've painted them up, I hope their fate won't be the same as the actual battle. Progress is being made on other pieces and so a modest flurry of completed posts - both figures and terrain - should be coming along in the next 2 weeks before Salute.
Wednesday, 3 April 2013
Scots Contingent - completed.
As I've painted them up, I hope their fate won't be the same as the actual battle. Progress is being made on other pieces and so a modest flurry of completed posts - both figures and terrain - should be coming along in the next 2 weeks before Salute.
Saturday, 23 March 2013
Robert, Lord Willoughby
This is a vignette of the English commander, Robert Lord Willoughby, who’s noted in the accounts of Cravant for vigorously leading the successful attack over the bridge, possibly to directly engage the Scots.
Lord Willoughby was from an established landowning family
with estates in Lincolnshire and East Anglia and was already an experienced
captain in English armies in France by 1423. He can first be found in the
Soldier in Later Medieval England database fighting in the Agincourt
campaign. In 1417 he was a captain indentured to Humphrey duke of Gloucester’s
forces which captured Bayeux and Lisieux and in the same year was made a Knight
of the Garter. In 1424 he was at the English victory at Verneuil. He continued
for many years to campaign in France and was an integral part of the English
occupation, being closely involved in the Lancastrian government. In 1430 he
was present at the coronation of Henry VI in Paris and two years later he was
appointed King’s Lieutenant in Lower Normandy. His last active campaign appears
to be in 1437. He died at the age of sixty seven in 1452.
The figures are Perry AO Range – the Willougby figure is
from the French command pack and has had the cast-on heraldry removed. These
have been painted by me using my usual layered approach (no short cuts on
these). I’ve purposely used washes a little more on these, particularly on the
plate armour, inspired by Stuart’s excellent painting guide for his Landsknechts and I’m happy with the results. The flag was purchased from GMB.
The post is homemade and bears the arms of Cravant town, with a declaration for the town to surrender to the French king pinned to it, made from a thin foil tomato paste tube. Fencing is cut down Renedra, bent into a slight curve to match the round base. Original plan was to add this post to the Willoughby base, but then thought that having them separate was a better idea.
If time allows I will make a gaming base for Lord
Willoughby, to lead the attack over the bridge… but that’s a “desirable to-do”
at this moment in time.
Sunday, 17 March 2013
Scots for Cravant - WIP
I’m making modest progress on a number of fronts, so this is
an update on prep for Cravant game, this time on one of the essential elements - more Scots.
The French army at Cravant was effectively a Franco-Scots
force, with the Scottish mercenaries potentially comprising around half of the
total men. This created a need to supplement the modest Scots contingent that I
already have. Since amassing my HYW armies, Claymore Castings figures have
arrived on the market, and so I decided to use these. Although the dress and
armour is of a slightly earlier period (circa 1400) they are lovely sculpts and
so this allows me to turn a blind eye to the minor anachronisms of ‘wrong
period’ – something which I expect most others outside of ancients &
medievals can’t so easily get away with. A couple of Perry men at arms have snuck their way in too.
I’d also been remiss in not having painted up any Paul Hicks
designed figures before. The only disappointment is that, as deadlines need to
be met, I have had to go the way of the dip to get enough figures done, which
means that I’ve not had the opportunity to do justice to some fantastic
sculpting – the figures are truly individual; full of character and flavour for
the period. I will have to revisit them sometime.
A dark tone dip has been brushed on and no further
highlights added afterwards, so please don’t look too closely at these if you
get to Salute! The only detailed handpainting has been some heraldic devices on
the coats of the leading men at arms. Humbrol Matt Cote was applied to tone
down the high gloss finish that comes from using Army Painter dip, except on the
armour plate and mail where it enhances the look. However I find that the varnish never really kills off the gloss in one coat, so they really have a semi-satin finish.
They are glued to 50mm square MDF bases from 'Warbases'. Basing is to be done and
flags added, so I’ll post some final pics
of the contingent.
Wednesday, 6 March 2013
A Miller's Tale
I have divided all the tasks I need to do towards the Cravant game into two categories - essential and desirable. In the essential list are the extra figures, river boards, etc; all of which have an impact on putting on a representation of the battle. The desirables are mainly peripheral terrain pieces and some vignettes, which if they're not done won't seriously impact the demo game - they're just nice to do. And therein lies my dilemma, it's the desirables that are more interesting and appealing - and are currently absorbing much of my time (...at the risk of me missing doing all the essentials!).
One of these is a watermill, to place along my new river sections - just to one end, with no effect on the game, but purely for some visual appeal. This is where I've got to with the mill so far.
The mill house is a straightforward paint job on one of the finely detailed Hudson and Allen medieval buildings. I chose this one as it's a little more substantial than most of the others and it's a nice mix of stone and timber frame (although the wooden doorway has a bit of an odd, non-medieval look about it). This is mostly careful drybrushing, as I've done with other H&A castings.
I spent some time searching for an appropriate wheel to use as the basis for the waterwheel, as I don't have the skills (nor time) to build one from scratch. I finally found plastic cartwheels from 'Hobbys' - made to go with their building plans for horsedrawn carts made from wood in 1/12 scale (or the like). They are a tad smaller than I really wanted to use, but they do have nice slim spokes. I glued two together and removed a narrow slice of the wheel to represent the part that's under the waterline. I added paddles from thin plasticard; chamfering the edges and adding some wood grain texturing by scratching with a wire brush. I'm happy with the final pre-painted wheel.
The pillars that sit in the river, for the axle to rotate on are based on some photos I found on the web and medieval illustrated chronicles of mills (an example shown below). It's not clear to me if the axle sat on top of the pillar or inserted into it - so I've gone for the latter option. The wooden pillars are balsa, cut into sections that represent additions made over time to brace and strengthen the wheel. The wooden boardwalk on the mill side are based on metal jousting barriers made by Steve Barber Models, turned upside down with balsa added on top.
All of these have to be painted as aged wood, as the next stage. The river sections remain as work in progress too.
One of these is a watermill, to place along my new river sections - just to one end, with no effect on the game, but purely for some visual appeal. This is where I've got to with the mill so far.
The mill house is a straightforward paint job on one of the finely detailed Hudson and Allen medieval buildings. I chose this one as it's a little more substantial than most of the others and it's a nice mix of stone and timber frame (although the wooden doorway has a bit of an odd, non-medieval look about it). This is mostly careful drybrushing, as I've done with other H&A castings.
I spent some time searching for an appropriate wheel to use as the basis for the waterwheel, as I don't have the skills (nor time) to build one from scratch. I finally found plastic cartwheels from 'Hobbys' - made to go with their building plans for horsedrawn carts made from wood in 1/12 scale (or the like). They are a tad smaller than I really wanted to use, but they do have nice slim spokes. I glued two together and removed a narrow slice of the wheel to represent the part that's under the waterline. I added paddles from thin plasticard; chamfering the edges and adding some wood grain texturing by scratching with a wire brush. I'm happy with the final pre-painted wheel.
The pillars that sit in the river, for the axle to rotate on are based on some photos I found on the web and medieval illustrated chronicles of mills (an example shown below). It's not clear to me if the axle sat on top of the pillar or inserted into it - so I've gone for the latter option. The wooden pillars are balsa, cut into sections that represent additions made over time to brace and strengthen the wheel. The wooden boardwalk on the mill side are based on metal jousting barriers made by Steve Barber Models, turned upside down with balsa added on top.
All of these have to be painted as aged wood, as the next stage. The river sections remain as work in progress too.
Friday, 1 March 2013
Terrain Boards - update.
A quick update on the terrain boards, to demonstrate that some progress is being made. The riverbanks are now done and I’m working on the water. Two of the double-length boards are shown here, with another standard square board also underway.
The riverbanks were textured with a mix of wall filler and PVA glue, with some sand glued on in places. These have been painted using my normal colours for groundwork; Citadel earth ('Steel legion Drab') followed by a drybrush of Plaka’s 'Gelbbraun' with white and a highlight of off white.
I’ve spent some time researching how others have done water features. One of the main considerations is what’s the correct colour – to which there are many answers. Water is of course transparent and it seems that the colour of a water feature is influenced by a combination of factors; the colour of the sky that reflects on the surface, the depth of the water and what’s under it, as well as the angle that you view it from. So taking all that into account, I’ve gone for a shade of blue...partly as psychologically this is the colour that I expect to see and a blue will create a greater contrast with the terrain boards. Also Cravant was fought in high summer, then I assume the sky was a cloudless blue that day!
The river colour is a mix of Citadel paints – Altdorf Guard Blue, Caliban Green and The Fang (a dark grey), in a 3:1:1 proportions mix. The lighter edges, representing shallower water, have had a light turquoise art acrylic added to the mix. So far two layers of gloss varnish have been applied; the aim to have five layers in all (which should darken the colours a little more). I’ll then add some ‘water effects’ brushed on, using Realistic Modelling Services ‘ripple maker’, to try and create some surface texture.
So far, so good….
Wednesday, 13 February 2013
"In goodly and true love..."
“In goodly and true love, brotherhood and union” is how the Anglo-Burgundian army was decreed to behave, as it arrayed at Auxerre on 29 July 1423, before setting off to relieve the besieged town of Cravant (according to Thomas Rymer’s Foedera, written in c1705 from extant documents of the time). When the English and Burgundian forces assembled codes of conduct were drafted to ensure co-operation and discipline was sustained, this being the first active campaign between the two forces following their recent alliance against the French crown. Rymer added that they were to “love, cherish and uphold each other as brothers, kinsmen and good friends.” Waurin, whose account of Cravant is much more contemporary, echoed this state of affairs, stating that the Anglo-Burgundians “took the field in great friendship”.
The Burgundian contingent appears to have totalled around 1,000 fighting men; so comprising the smaller element of the overall army of about 5,000 (according to Waurin’s Chronicle). Accounts of the battle, written from an English perspective, focus on the exploits of English leaders in their attacks across the river. But there is nothing to suggest that the Burgundians did not play their full part in the fighting on the day, under the overall leadership of the earl of Salisbury.
Here are the completed additional Burgundian figures that I’ve done for the Cravant game. The men at arms comprise four bases and are Perry figures with a couple of Steel Fist Miniatures included. Painting is mainly by Jim Bowen, except for the men at arms wearing the heraldic surcoats which I’ve done (my reference being the useful Freezywater flag sheets). The flags are free downloads from the Kriggspil site, added for speed, of the arms of Burgundy.
I’ve made the Burgundian ‘battle’ a balanced force; of equally sized men at arms with pavisers, and crossbowmen. I may need to bulk up this contingent, once I get to placing the figures on the proposed terrain set-up – in which case I’ll draft in some ‘unemployed’ French pavisers…no one will ever notice!
Saturday, 9 February 2013
A river runs through it
I've started work on the additional baseboards that are needed for the Cravant game. In fact they are essential, as the river Yonne ran across the battlefield; initially dividing the two armies before the fording by the Anglo-Burgundians and subsequent attack.
I'm aiming to make boards that fit in with my existing ones, all of which I purchased from Realistic Modelling Services over a number of years. However Keith at RMS can no longer make bespoke boards, so it's down to me to make my first ever terrain. Generously Keith is assisting with guidance on what I need to purchase and sending 'how to' emails for me to follow as best I can.
The baseboard construction follows a typical manner. I had 12mm MDF sheets cut to size at my local DIY store - two sheets of 100x50 cms and one of 50 cms square. To this were glued sheets of blue foam, purchased from Antenociti. These had been cut beforehand with a long bladed knife to create a meandering river course and sloping sides cut roughly at an angle down to the water level. The river width is about 8 inches.
The riverbanks (and some corners which were off true) had a covering of mixed PVA glue and wall filler brushed over to create some texture (the rest of the boards will be flocked). Once dried the edges of the river bank contours were smoothed with sandpaper, then some stones and sand were glued on to create some details to pick out when painted. I also inserted some hollow plastic rod into holes drilled into the foam layer, along the river bank to give me options to insert trees I have which have brass rods coming from the base of the trunks. The river banks will now be painted, to match my basing as best I can, before I tackle the water.
Here's the rough layout that I've drawn up for the game, showing the proposed placement of troops and the main terrain features (if i can them all done).
Some figures should be up next....
I'm aiming to make boards that fit in with my existing ones, all of which I purchased from Realistic Modelling Services over a number of years. However Keith at RMS can no longer make bespoke boards, so it's down to me to make my first ever terrain. Generously Keith is assisting with guidance on what I need to purchase and sending 'how to' emails for me to follow as best I can.
The baseboard construction follows a typical manner. I had 12mm MDF sheets cut to size at my local DIY store - two sheets of 100x50 cms and one of 50 cms square. To this were glued sheets of blue foam, purchased from Antenociti. These had been cut beforehand with a long bladed knife to create a meandering river course and sloping sides cut roughly at an angle down to the water level. The river width is about 8 inches.
The riverbanks (and some corners which were off true) had a covering of mixed PVA glue and wall filler brushed over to create some texture (the rest of the boards will be flocked). Once dried the edges of the river bank contours were smoothed with sandpaper, then some stones and sand were glued on to create some details to pick out when painted. I also inserted some hollow plastic rod into holes drilled into the foam layer, along the river bank to give me options to insert trees I have which have brass rods coming from the base of the trunks. The river banks will now be painted, to match my basing as best I can, before I tackle the water.
Here's the rough layout that I've drawn up for the game, showing the proposed placement of troops and the main terrain features (if i can them all done).
Some figures should be up next....
Subscribe to:
Posts (Atom)